Author Topic: Bruiser Mk II  (Read 1110 times)

0 Members and 1 Guest are viewing this topic.

Terry

  • Custodian
  • Registered Member

  • Offline
  • ***
  • Serial Moke Offender

  • 16246
  • Location: Melbourne
Bruiser Mk II
« on: January 11, 2019, 11:17:38 AM »
Hi,

this is a Moke project that I have had floating around the garage for nearly a decade and just doing little bits in dribs and drabs but I have cleared the workflow diary and now I am making a push to get this finished over the next month or so. This is the first Moke that I recall ever seeing that got me started with my first Moke nearly thirty years ago. (I have since found a photo I took of the End Rust Moke at the end of the 1977 Around Australia Rally when I was a kid, so that is technically the first I saw).

The Moke is called Bruiser and is mostly a one owner Moke with my friend buying it not long after it left the dealership in 1979. The name Bruiser comes from the black and blue scheme that he had for it in its day and the restore is about getting it back to better than its former glory after having spent 15 years under a cover beside the house. It was in a pretty sad state rust wise but that has all been fixed very nicely by my favourite paint and panel man.

The colour is a period Leyland colour but it was never on a Moke and I couldn't tell you what it was on, but it took some effort to track it down from a hazy memory and eventually found someone who could reach for a book when the computer said it didn't exist. It is a metallic, now in two pack, and although not a flip colour it has about four distinct colours when looking at, so really did/does my head in when comparing it to the original paint.


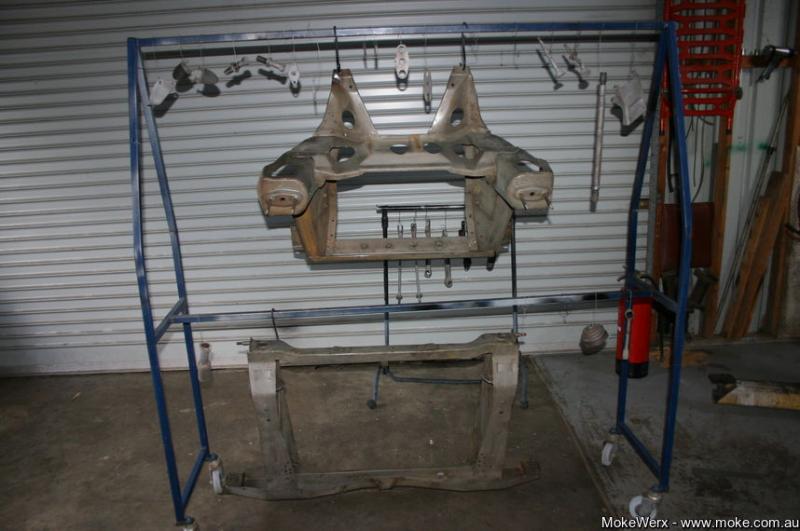
I have had all the big items blasted years ago and covered them with xtroll so to start off with I cleaned them up and got them ready for painting along with other bits. I don't have an after picture but I used PPG black industrial enamel which should hold up well.


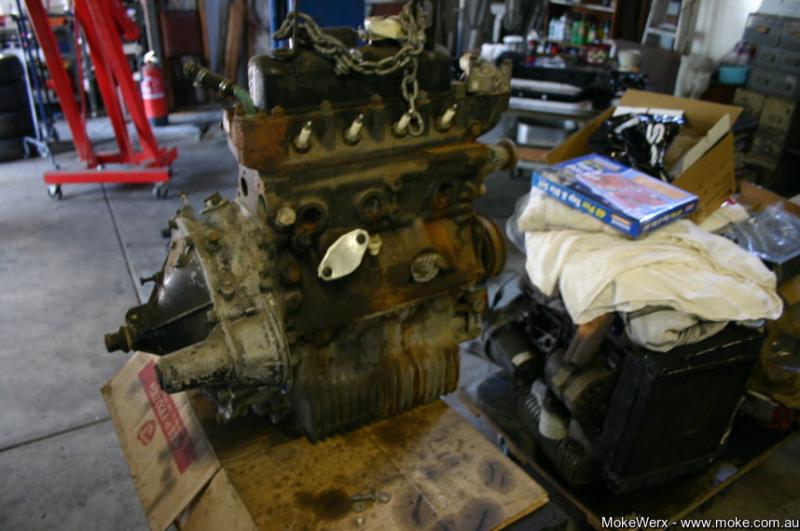
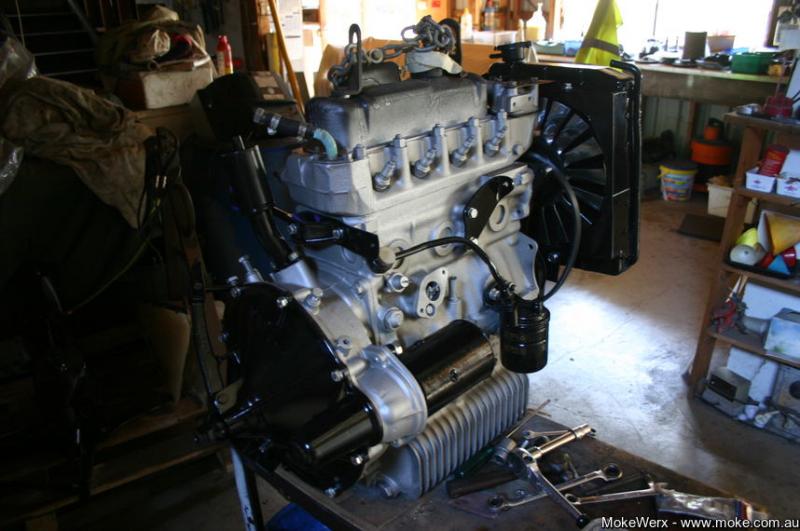
The engine isn't getting rebuilt internally as I have had it running and the numbers seem good however the welsh plugs were leaking and there were signs of the timing seal and primary seal leaking so I stripped it down,cleaned the crud off and got it ready for painting and replace the plugs and the seals and painted it before bolting bits back on.


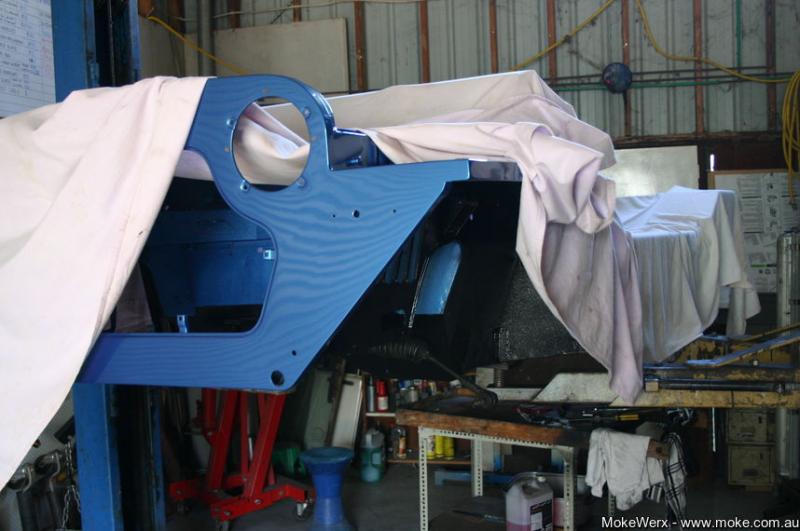
The body got moved from the truck where it has been stored and has taken up pride of place on the hoist and so the first job was to fit the steering rack. I always do the rack first, after that the order of things is less important.


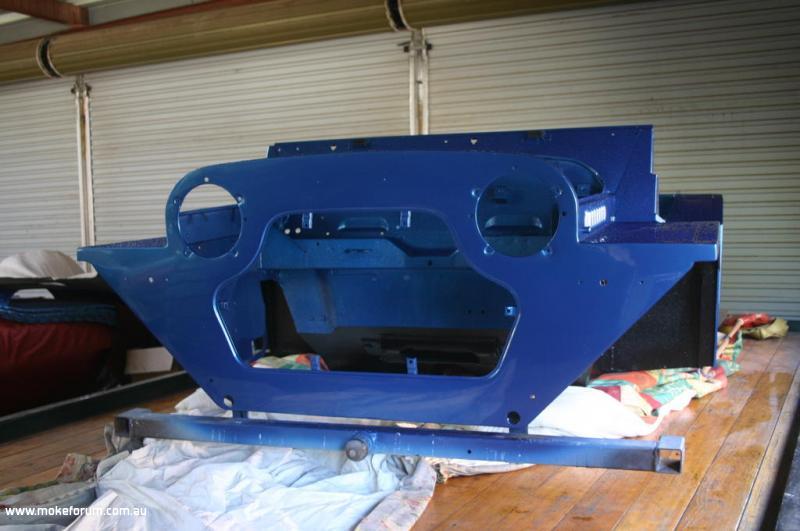
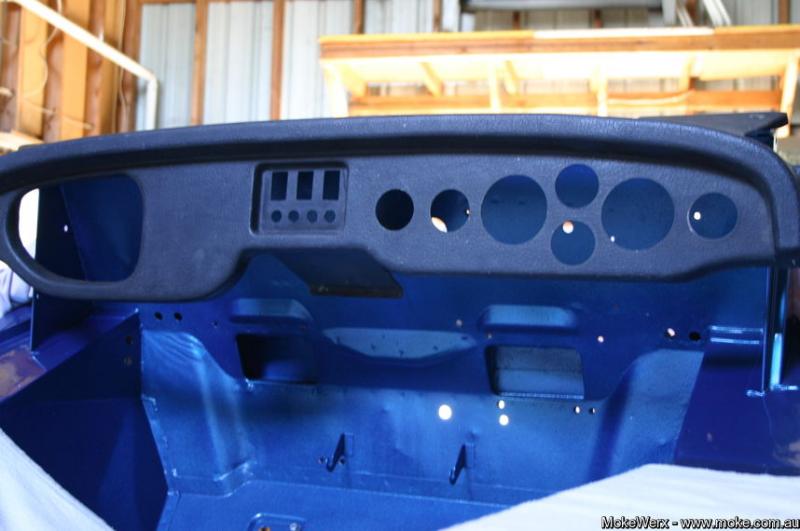
And for something completely different, the Moke has a few goodies from the 1980's  like front and rear torsion bars and a little box which sits on the speedo drive from the gearbox and I assume does some sort of ratio change. However the most notable customisation is this dash which I am told is one of only two made in Sydney, so here you get to see it in place. I am not looking forward to the wiring on this one. :)
« Last Edit: January 11, 2019, 11:22:43 AM by Terry »

Pete Power

  • Standard
  • Registered Member

  • Offline
  • *
  • MIGHTY MOKE

  • 3105
  • Location: Adelaide S.A.
Re: Bruiser Mk II
« Reply #1 on: January 11, 2019, 11:30:27 AM »
Wow nice colour and very trick looking dash.
Interested to see the Torsion bars, something I have thought about on those day dreamy days  :o
Happy Mokin
Regards
Pete

1981 Californian 1275 Galv "Mighty Moke"

"Just because you're breathing doesn't mean you're alive!"

Halfpint

  • Forum Support Group
  • Registered Member

  • Offline
  • ***
  • MOKE Pilot

  • 4395
  • Personal Text
    It's not where you go, it's how you get there !
  • Location: N/E Vic. Australia
Re: Bruiser Mk II
« Reply #2 on: January 14, 2019, 08:52:08 AM »
Hi
It is a nice colour even when you get up close.
The dash sure is different and looks really well made. Will be interesting to see it all installed and how it looks without the standard centre console.

Have fun with the Brusier.
HP
The happiest of people don't always have the best of everything, they just make the best of everything they have.

CQ_Moke

  • Standard
  • Registered Member

  • Offline
  • *

  • 396
Re: Bruiser Mk II
« Reply #3 on: February 09, 2019, 10:26:15 AM »
Looks like an interesting moke
1978 Californian "restored" and enjoying daily :)
1981 "in progress" SHMBO's car

Moke 71

  • Standard
  • Registered Member

  • Offline
  • *

  • 1200
  • Location: Thetunnels.com.au
Re: Bruiser Mk II
« Reply #4 on: February 09, 2019, 09:00:40 PM »
So terry you’ve cleared your diary, so what have you done in a month?
Moke 1971
Moke 1976 - Daily
Moke 1978 Californian
Moke 1979 - AKA Thomas
and too many round nose minis

Terry

  • Custodian
  • Registered Member

  • Offline
  • ***
  • Serial Moke Offender

  • 16246
  • Location: Melbourne
Re: Bruiser Mk II
« Reply #5 on: February 09, 2019, 09:37:36 PM »
Quote
So terry you’ve cleared your diary, so what have you done in a month?

Nowhere near as much as I expected I would. :)

But things are progressing as I do things like spend all day today trying to get the remote change to sit properly on a bracket that avoid the exhaust and I still haven't solved the issues.

But I did install the Engine before xmas with most bits bolted in and just lowered the body onto the subframe and engine assembly.


And looking at the engine getting positioned in the engine bay.


With things all bolted up it looks like I did a lot of work in that hour.


And while doing a simple little modification on the rear subsframe like popping out the bumpstop button using my hand and a drift I was surprised to hear a very heavy sounding bang and clatter as something more than the button hit the floor.


I had two goes at welding it back in place before I got it to stay there so I learnt to clean the rust and scale off first. There was two locating lugs still in the hat so I drilled a couple of holes in the other two quarters and then using a suspension compression tool I clamped it back in place and welded through the holes to get it right. On the rear the donut locates around the inside so this piece has some force on it and there is not enough room to weld around the edges.

The rear subframe is mostly complete except for a couple of brake lines I have to make up. It has new donuts in the back, and front, but with the slightly lower profile tyres I have got the okay to get I think it will probably sit up too high so I may look to put in some NOS donuts I have which are slightly lower than the new ones or find a set of good 2nd hand ones to bring the body down a bit. Failing all that the front end has some very old school 'hi-los' that may not work there so I might put them in the back and put some common garden variety ones in the front.


Terry

Halfpint

  • Forum Support Group
  • Registered Member

  • Offline
  • ***
  • MOKE Pilot

  • 4395
  • Personal Text
    It's not where you go, it's how you get there !
  • Location: N/E Vic. Australia
Re: Bruiser Mk II
« Reply #6 on: February 10, 2019, 08:14:10 AM »
Hi Terry,
You've gotten a fair bit done and its looking good.
Considering how long its been sitting around, I'll bet your spending a fair amount of time finding all the bits to put back on  :)
Wish I had a car hoist, lowering the body over engine already mounted in the subframe would be a good way of assembling it all.

HP
The happiest of people don't always have the best of everything, they just make the best of everything they have.

Terry

  • Custodian
  • Registered Member

  • Offline
  • ***
  • Serial Moke Offender

  • 16246
  • Location: Melbourne
Re: Bruiser Mk II
« Reply #7 on: February 10, 2019, 10:38:44 AM »
Hp,

I am spending a lot of time looking for things, cleaning them up, painting and making improvements. Sometimes I just have to bolt something onto the Moke to feel like I have done something for the day.

The photos were about a week old, so the pedals and steering column is in, handbrake is in, Master Cylinders, engine steadys and the next few days will be getting the roll bar prepped and painted so I can bolt that down and run the wiring and get the fuel tank in.

Terry

Terry

  • Custodian
  • Registered Member

  • Offline
  • ***
  • Serial Moke Offender

  • 16246
  • Location: Melbourne
Re: Bruiser Mk II
« Reply #8 on: February 10, 2019, 07:18:19 PM »
Hi,

a bit more work done today getting the bumpers and roll bar ready for a coat of paint. The front bumper had a big crease and a couple of smaller dings which I filled up with some body filler and made them disappear but to get rid of the noticeable bend on the drivers side I needed to find an immovable object and flex a bit of muscle.


The bumpers came up quite nice under a coat of primer.


The roll bar is a factory issue item and it needed a bit of rubbing down, it was sandblasted years ago and coated in xtroll, and it was ready for the primer coat.


Terry

Drakman

  • Standard
  • Registered Member

  • Offline
  • *

  • 538
  • Location: Mostly Maroochydore
Re: Bruiser Mk II
« Reply #9 on: February 10, 2019, 08:39:10 PM »
Is that an actual factory roll bar Terry?  I ask because i was given one in pretty good nick, i was going to cut it up if it's a genuine part i might just keep it intact.

Terry

  • Custodian
  • Registered Member

  • Offline
  • ***
  • Serial Moke Offender

  • 16246
  • Location: Melbourne
Re: Bruiser Mk II
« Reply #10 on: February 10, 2019, 10:41:32 PM »
Is that an actual factory roll bar Terry?  I ask because i was given one in pretty good nick, i was going to cut it up if it's a genuine part i might just keep it intact.

Yes it is, apparently. There are a few version of which Mokes got them and whether they were factory or not, but there is apparently drawings around showing they were a Leylalnd item that was available around 1978 and maybe 1979 if it came on this Moke from new. I will have to ask the owner.

It is also thought they came out under the Factory fibreglass hoods Leyland were making at the time.

The key identifiers are the middle post is on the bottom of the slope and the seat belt mount up high and looking a bit agricultural.

Terry

Terry

  • Custodian
  • Registered Member

  • Offline
  • ***
  • Serial Moke Offender

  • 16246
  • Location: Melbourne
Re: Bruiser Mk II
« Reply #11 on: March 04, 2019, 10:42:38 PM »
Hi,

things have been progressing along with this rebuild but keep forgetting o take the camera with me so not too many pictures.

We are back on the wheels now after the original fitting up of the suspension meant things were way to high all around, so I replaced the front adjustable struts that were in the Moke with the ones that are available now giving a greater range of of adjustment and fitted the original struts into the rear with a special extension bar that Peter on here made up for me. Fitted up one of the rubber wheel arches and it all looks much better.


The problem with the rear donut locator is the problem that just keeps giving, having returned when I was working on the back end. It seems the welds just did not hold and it fell out again. To fix it this time I fixed it back up in place, drilled four holes right through the locator and the subframe and then cut up a thick wood nail to make small pins and then put them in the holes and welded the pins to lock it all in place.

The alternator got a rebuild mostly because it was filthy dirty and once apart a bearing was failing. A couple of 5AM yoghurt containers are just the right size to mask off the coil so I could paint the bit we see while the rest of the housing got a blast and paint job.


With the heat that has been around the past few weeks getting opportunities to get the big items painted has been tricky with me doing some painting at 7:30 one morning but the roll bar, bumpers, windscreen frame, headlight buckets and lots of little sundry items are now done and are ready to start bolting back on so it is starting to look like a Moke again, with bumpers fitted.

I had the wiring loom out on the floor a couple of weeks ago and for a custom dash the wiring is pretty much original except for a handful of extras for lights and gauges. I also found out the dash was bought from a shop back in the 80's, not a custom job as i thought, so there might be others out there.

Terry

« Last Edit: March 04, 2019, 10:45:16 PM by Terry »

Terry

  • Custodian
  • Registered Member

  • Offline
  • ***
  • Serial Moke Offender

  • 16246
  • Location: Melbourne
Re: Bruiser Mk II
« Reply #12 on: March 09, 2019, 07:57:23 PM »
Hi,

lots of running around getting more things to bolt on to the project and fixing up other things to get them ready but today a bit of work and the Moke starts to take shape.

The roll bar is now back on Bruiser and bolted down tight with some nice shiny bolts that might get a coat of black when the detailing happens later on.


And with the Dash in position.


The reason this is a bit of milestone is because I have been wanting to see the dash in place with the roll bar fitted so that I can see where the next headaches that needs fixing, coming up with someway to tidy up the dash ends where if meets the roll bar and hide the ends that you would be able to see through the side screens.


And it is not quite simple of course as I found today when I put the dash back in as it needs to be twisted and tilted and holding your tongue the right way to get it in place so at least one idea of fibreglassing the gap so it is one piece is not going to work.


And if you are thinking of parking your Moke up for 20 odd years, thinking about covering the windscreen or don't point it north.


Terry
« Last Edit: May 24, 2019, 08:52:46 PM by Terry »

Terry

  • Custodian
  • Registered Member

  • Offline
  • ***
  • Serial Moke Offender

  • 16246
  • Location: Melbourne
Re: Bruiser Mk II
« Reply #13 on: May 27, 2019, 03:39:18 PM »
Hi,

I have been back working on Bruiser the past week or two although not much difference to see since the last photo, mainly getting the exhaust and dash sorted out.

MoeMoke has been trawling Carsales.com.au which is probably a bad idea, but he did send me this little Gem of another fibreglass dash the same as what I am working on. I have found a little more about them in that they were available as a Moke accessory from a shop in Sydney and there may be more than two out there.


In comparison with the dash I am working on you can see there is a piece in the centre missing from the above picture. Although both Mokes have the dash installed the same I have worked out that the f/g dash was supposed to go over the standard set up and that centre piece missing in the first photo actually rested on the face of factory console to support the f/g dash.

Terry

« Last Edit: May 27, 2019, 03:41:06 PM by Terry »

Pete Power

  • Standard
  • Registered Member

  • Offline
  • *
  • MIGHTY MOKE

  • 3105
  • Location: Adelaide S.A.
Re: Bruiser Mk II
« Reply #14 on: May 27, 2019, 04:41:42 PM »
different gauge configuration as well
Happy Mokin
Regards
Pete

1981 Californian 1275 Galv "Mighty Moke"

"Just because you're breathing doesn't mean you're alive!"