Author Topic: Aurora Rebuild  (Read 2294 times)

0 Members and 1 Guest are viewing this topic.

Terry

  • Custodian
  • Registered Member

  • Offline
  • ***
  • Serial Moke Offender

  • 16246
  • Location: Melbourne
Re: Aurora Rebuild
« Reply #15 on: October 30, 2019, 12:27:55 PM »
I really like the RC. When you put it on the seams it just gets sucked in where it is needed.

That is the really important bit, getting it into the seams and crevices as that is where the rust will be starting. On the open panels you will probably end up sanding a lot of it off anyway just in normal preparations and the primer and paint coating will seal the metal.

Terry

dwethera

  • Standard
  • Registered Member

  • Offline
  • *

  • 25
  • Location: Brisbane West
Re: Aurora Rebuild
« Reply #16 on: November 03, 2019, 05:37:42 PM »
I thought it timely to post some progress photos. My MIG welding is progressing but not as fast as my angle grinder skills. The inside of the battery box had nothing left of the Bermuda triangle. In that section I opted to fold a vertical piece all the way to the top of the outer side of the triangle. This was how it was done originally on this car BTW. On the other parts there was enough meat left to plug weld the vertical fold of the floor patch. I opted to butt weld the floor side. It is just spot welded in ATM and I plan to complete the full butt weld when I flip the body upside down. That way I only have to grind off the spots and not the full weld bead where it can be seen. I have to do the strips in 600mm lengths because that was the biggest piece of sheet I can bend in my home made folder. It just takes a bit of time to scribe and file the edges to match close enough for a butt weld.

I will post some before and after photos of my battery box when I get my paint drama sorted.


My Xtroll RC dramas are also continuing. I still have not found a product that will go between the RC and the final paint. It just fries up like paint stripper. If you know of a compatible product please let me know. This is very concerning as I have coated a lot of work with RC. All the insides of the side boxes have been meticulously scrapped back and coated with RC. I want the inside of the boxes to match the final outside car color. I plan to use normal acrylic paint. There has to be some reason why this is happening. Below is a piece of cold rolled mild steel with 48H old Xroll RC applied. The primer was applied by brush and is SCA primer surfacer.


dwethera

  • Standard
  • Registered Member

  • Offline
  • *

  • 25
  • Location: Brisbane West
Re: Aurora Rebuild
« Reply #17 on: November 05, 2019, 09:52:13 AM »
I'm not sure why my last post did not make it to the thread. It is in the Topic Summary section??

I tried GP primer on the Xtroll RC and got the same result. I have had no reply from the Xtroll support email other than to say they received the original inquiry.  Not sure about this product. It seems to do a good job but is useless if it is incompatible with most other commonly used paint products.

Do you know if other primer paints like Kill Rust or Rustoleum are compatible with acrylic car paint? Maybe I can use those as a primer layer between the RC and the acrylic top coat?

I think I will revise my strategy and use RC in seam joints and non visible sections only. Remove it with wire wheel in visible places and use etch primer on the bare metal. That way the RC is in the seams where it seems to do a good job and not where it will ruin the primer in visible places. I'm just annoyed that the can clearly states "Easily Painted Over". NOT true!!

dwethera

  • Standard
  • Registered Member

  • Offline
  • *

  • 25
  • Location: Brisbane West
Re: Aurora Rebuild
« Reply #18 on: November 15, 2019, 06:11:58 PM »
I'm not sure why my last post did not make it to the thread. It is in the Topic Summary section??

I tried GP primer on the Xtroll RC and got the same result. I have had no reply from the Xtroll support email other than to say they received the original inquiry.  Not sure about this product. It seems to do a good job but is useless if it is incompatible with most other commonly used paint products.

Do you know if other primer paints like Kill Rust or Rustoleum are compatible with acrylic car paint? Maybe I can use those as a primer layer between the RC and the acrylic top coat?

I think I will revise my strategy and use RC in seam joints and non visible sections only. Remove it with wire wheel in visible places and use etch primer on the bare metal. That way the RC is in the seams where it seems to do a good job and not where it will ruin the primer in visible places. I'm just annoyed that the can clearly states "Easily Painted Over". NOT true!!

dwethera

  • Standard
  • Registered Member

  • Offline
  • *

  • 25
  • Location: Brisbane West
Re: Aurora Rebuild
« Reply #19 on: March 16, 2020, 01:06:45 PM »
I have rebuilt the Bermuda triangle on passenger and driver sides and want to rust treat the inside. Currently it has no coating because I found that X Troll RC affects welding too much. At least I could not get a good bead flow when Xtroll was around.

My plan is the put a 20mm hole in the triangle ( which will be plugged with a blind grommet later) to get access the length of the cavity. I then plan to put a micro irrigation spray nozzle on the end of a bit of rigid 6mm irrigation tubing and feed that through the hole. The Xtroll will get to the nozzle via a garden pump pack sprayer. Hopefully I will be able to coat the complete inside of the triangle by moving the sprayer along the length of the cavity. I looked at various nozzles and I think the higher flow ones will handle the higher viscosity Xtroll. They also come in a variety of spray patterns! The nozzle will of course be sacrificed to the greater cause.

I have not built this setup yet but would like to know how other people have done this? I'm sure there is some one who has come up with a clever way to treat inside the triangle?

David W


Steam

  • Standard
  • Registered Member

  • Offline
  • *

  • 378
  • Location: North west vic
Re: Aurora Rebuild
« Reply #20 on: March 16, 2020, 05:50:54 PM »
Good evening,
Your plan sounds good. I had a need to varnish inside a semi sealed wooden box area a number of years ago and I ended up just fogging the varnish in as most pipe and nozzle setups were too small and clogged continually.
In the uk a product called waxoyl is applied with tubes and nozzles into  sills etc, that may be of s9me inspiration.
Cheers Dave.
Cheers, Dave

dwethera

  • Standard
  • Registered Member

  • Offline
  • *

  • 25
  • Location: Brisbane West
Re: Aurora Rebuild
« Reply #21 on: March 17, 2020, 10:32:06 PM »
I actually found a 3M product called Cavity Wax Plus that comes with a pressure spray can and applicator wands. Unfortunately it is very expensive for what it is. They want ~$80 for one can and the single use applicators. I am always looking for ways to do the same job with common (cheap) devices. I will make one up on the weekend if it works I will post some photos.

Terry

  • Custodian
  • Registered Member

  • Offline
  • ***
  • Serial Moke Offender

  • 16246
  • Location: Melbourne
Re: Aurora Rebuild
« Reply #22 on: March 18, 2020, 09:28:26 AM »
Hi,

I have a couple of small holes drilled in the bermuda triangle, near the top of the triangle and every few years, or when I think about it, I squirt a few horse syringes of xtroll(but you could use whatever you like) and then use the air gun in the same hole to blow it around and spread it out.

Terry

dwethera

  • Standard
  • Registered Member

  • Offline
  • *

  • 25
  • Location: Brisbane West
Re: Aurora Rebuild
« Reply #23 on: April 06, 2020, 11:57:18 AM »
I am updating with some photos of progress. It took a long time to fabricate the toe board parts but in the end they came out OK I think. I put a fold on the front edge of the shifter brackets to give them some additional strength.

This is the driver toe board before.


Driver toe board after


New shifter brackets. They were not there when I got the car. The shifter was dangling in free space.
« Last Edit: April 06, 2020, 06:27:14 PM by Terry »

Terry

  • Custodian
  • Registered Member

  • Offline
  • ***
  • Serial Moke Offender

  • 16246
  • Location: Melbourne
Re: Aurora Rebuild
« Reply #24 on: April 06, 2020, 12:18:22 PM »
Hi,

on the shifter brackets do you have some way to secure the cotton reel mount, either a fixed thread or a space for a spanner to get in there?

Terry

Halfpint

  • Forum Support Group
  • Registered Member

  • Offline
  • ***
  • MOKE Pilot

  • 4394
  • Personal Text
    It's not where you go, it's how you get there !
  • Location: N/E Vic. Australia
Re: Aurora Rebuild
« Reply #25 on: April 06, 2020, 01:43:14 PM »
Hi,


Does look really good.

HP
PS: if you copy the bb code rather than the thumbnail code, the pic will be bigger and easier for us see the good work your doing on this build  8)
The happiest of people don't always have the best of everything, they just make the best of everything they have.

dwethera

  • Standard
  • Registered Member

  • Offline
  • *

  • 25
  • Location: Brisbane West
Re: Aurora Rebuild
« Reply #26 on: April 06, 2020, 08:55:22 PM »
The rear facing side of the brackets do not have the extra fold. I tested the clearance with my ratchet ring spanner before attaching to body.

dwethera

  • Standard
  • Registered Member

  • Offline
  • *

  • 25
  • Location: Brisbane West
Re: Aurora Rebuild
« Reply #27 on: June 10, 2020, 05:49:26 PM »
I am about to finish off the metal work on the underside and will be flipping the body right side up. My original seats are the sling type and I am considering better more comfortable replacements. I am asking this now because if there is any modification to the body to make seats fit I would rather do it before painting etc.

I have been told the MX5 NA NB series seats are good but they seem to be hard to find. I guess that model is ~20years old now so not so surprising. I have read about having to swap driver for passenger etc which all seems quite achievable.

Can you give me some guidance/opinion on which way I should go with this? If I put the original seats back in and upgrade later will I need to modify any metal work? Is there another small car seat that is a later model than the MX5 NA NB series that can fit?

I will continue to read the seat stuff here on the forum.


Drakman

  • Standard
  • Registered Member

  • Offline
  • *

  • 538
  • Location: Mostly Maroochydore
Re: Aurora Rebuild
« Reply #28 on: June 10, 2020, 07:55:40 PM »
I'm not quite sure if the NB seats fit, i think only the NA model MX5 seats will work in a Moke.

dwethera

  • Standard
  • Registered Member

  • Offline
  • *

  • 25
  • Location: Brisbane West
Re: Aurora Rebuild
« Reply #29 on: July 13, 2020, 09:47:12 PM »
Time for an update and some photos of progress.

The front grill was pushed back about 25mm from where it should be. I was going to try and push it out but soon discovered a lot more damage under the green paint. So I cut the crumpled metal out and built a new front piece as well as the supporting brackets that were in behind.

I have looked at some other peoples' stripped chassis and have to say that some are really impressive. I don't think my vehicle was as straight and flat as those when it rolled out of production. Pretty much every panel on my car has something wrong with it, was missing, or was rusted away. My approach has been that I can't make a whole new body so I get the bad/missing/rusted bits to be better than most of the bits that don't actually need repair/replacement.  If I get something really flat and straight it just makes the rest of the car look bad. So I just work with what I've got and try to make it look consistent. The main thing is that I really enjoy just cutting, shaping and welding the metal bits. I have learn't heaps and had a lot fun doing it. The big advantage of working on a Moke is that the panels are mostly flat with simple folds.


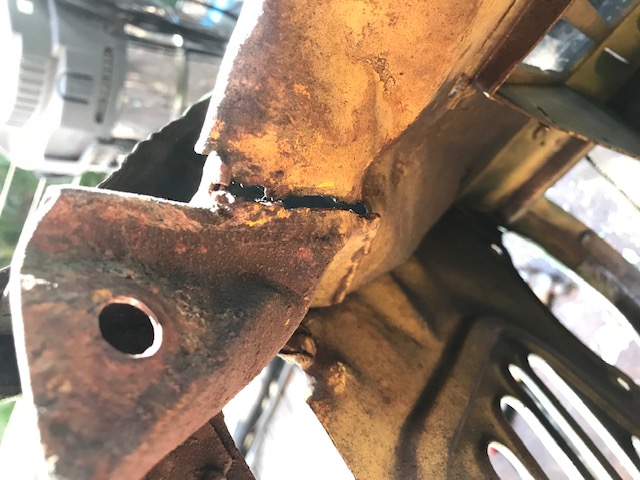
Damaged subframe support bracket


Damaged subframe bracket top view
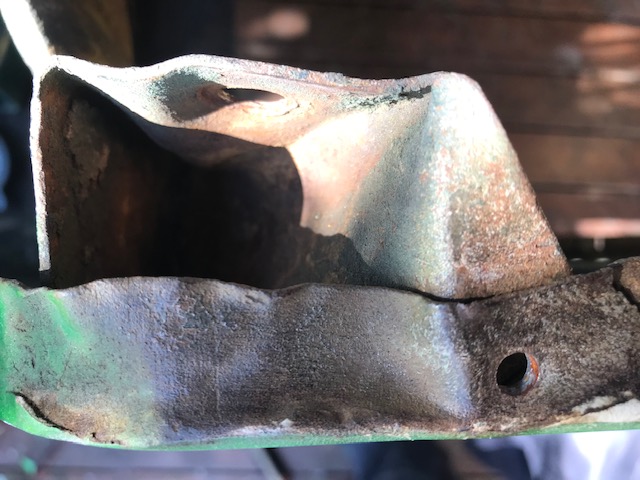


Damaged grill panel


Removed grill piece


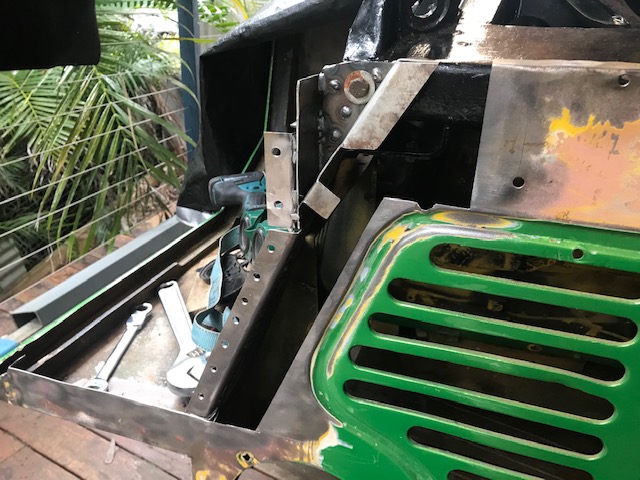
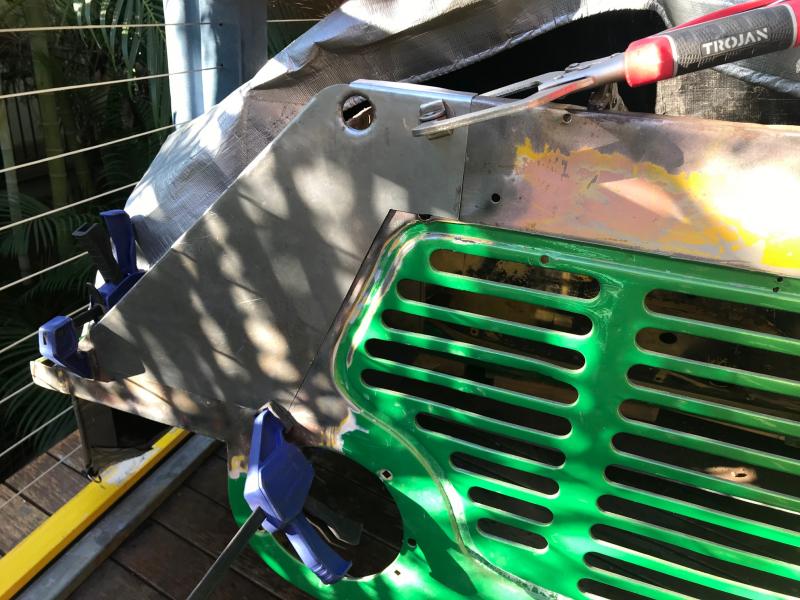
New subframe bracket and support pieces


Holding it all in place


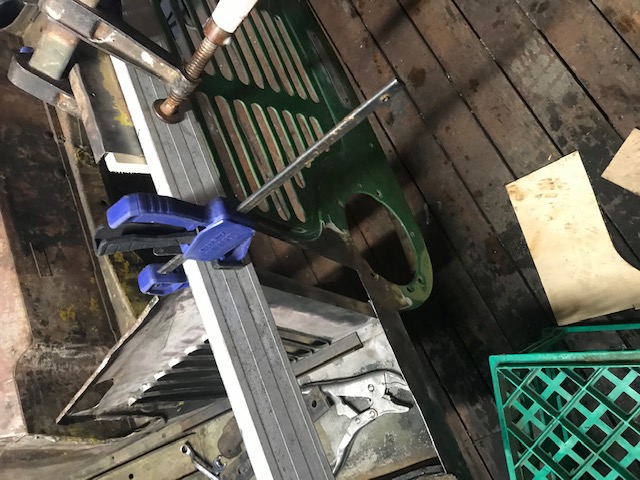
New fabricated piece ready to be welded in place. The oval hole will be easier to cut when fixed to the vehicle.


Rust removal and damage repair is getting close to complete. Can someone give me an idea how much a reasonable paint job might cost. The original car was yellow but I will probably go with a vivid non metalic green. I am looking at getting underneath and the inside of the hulls all done the same colour. The car does not warrant a premium job.